Policy Approval Workflow Automated policy approval workflows offer several benefits that can significantly enhance ...
Configure SharePoint SP2019 to support SPFx applications
This post describes how to configure your on-premise SharePoint 2019 farm to allow you to deploy and run SPFx applications.
The instructions below will take you through the steps required to install each pre-requisite. Depending on the status of your farm, you may already have some of the pre-requisites installed and configured. If that is the case, you will be asked to jump to the following section.
IMPORTANT - You will need to be connected with a SharePoint farm administration account in order to follow these steps.
Configure the SharePoint App Catalog
You need an App Catalog configured in your farm so that you can deploy the SPFx apps into it.
- Open the SharePoint 2019 Central Administration site
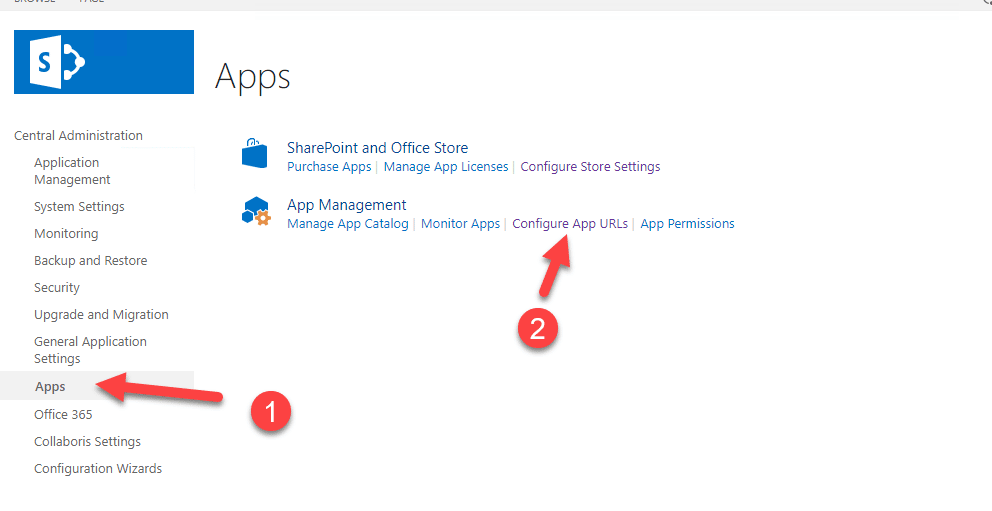
- From the left menu, click "Apps"
- Under App Management click "Manage App Catalog"
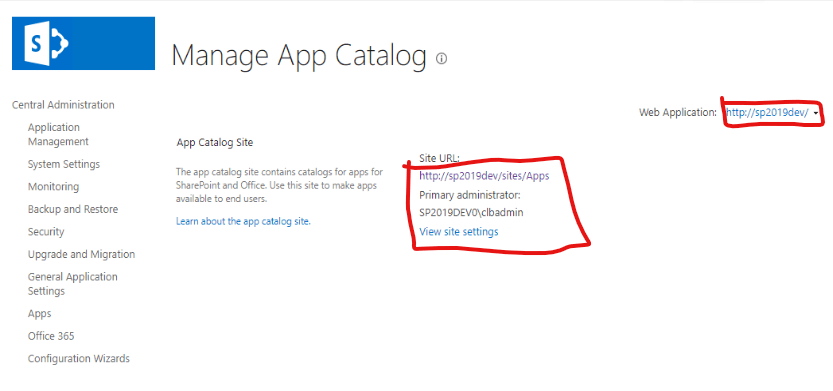
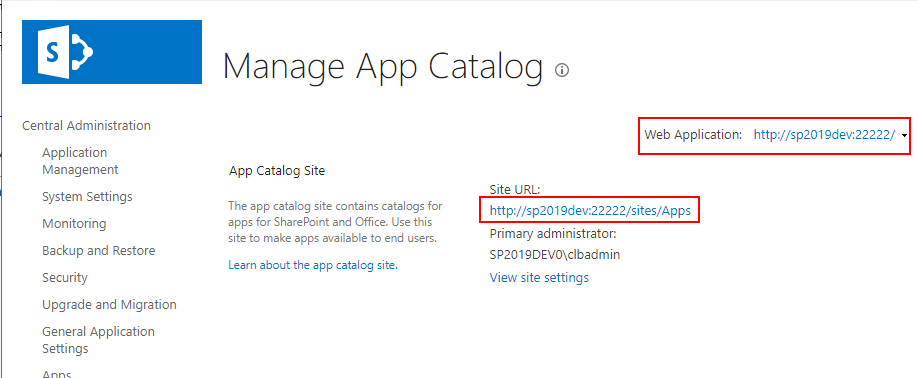
- On the Manage App Catalog site, please ensure you have selected the web application where you will want to install the App Catalog on the top right corner
IMPORTANT - The web application you choose needs to be the same web application containing the sites where you will want to deploy your SPFx App.
- If you can see a section under "Site Url" (see screenshot below), it means that you already have an Application Catalog installed and can proceed to the next section.
- If you cannot see the image above and see a section instead asking you to create a new app catalog site (as per the image below), then please stay in this section and continue to the next bullet point
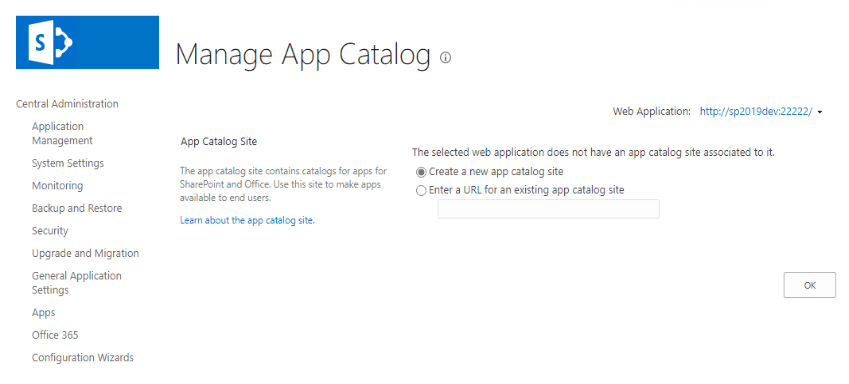
- In the Manage App Catalog screen, ensure that the option "Create new catalog site" is enabled and that the correct web application is selected and press "Ok"
- Fill in the details to create an App catalog (example below)
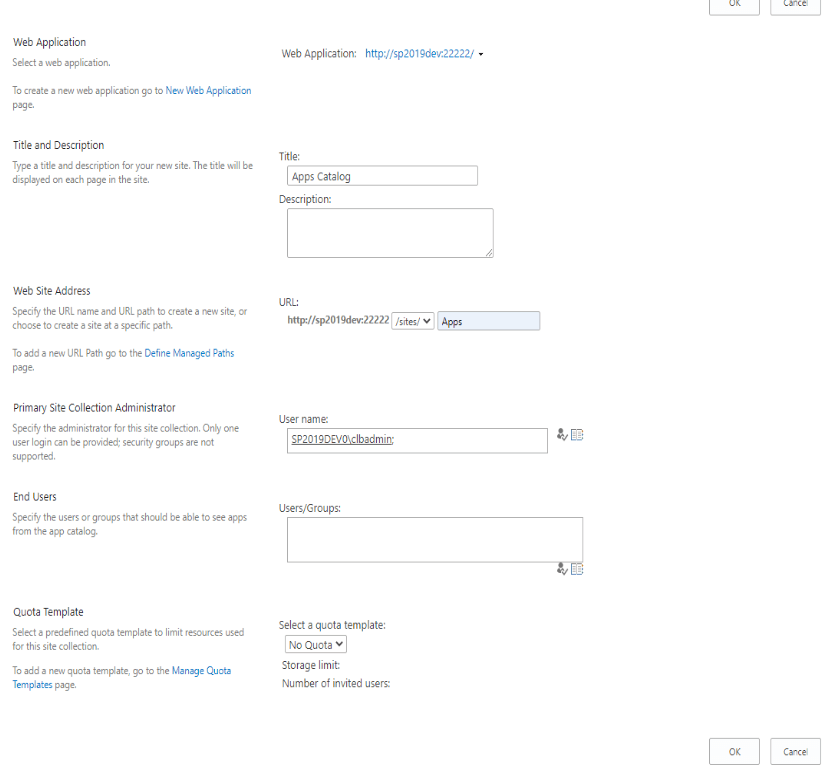
- Click "Ok"
The SharePoint App Catalog is now configured and you can move to the next section below.
Configure and enable the App Management Service
The App Management Service must be running on your farm.
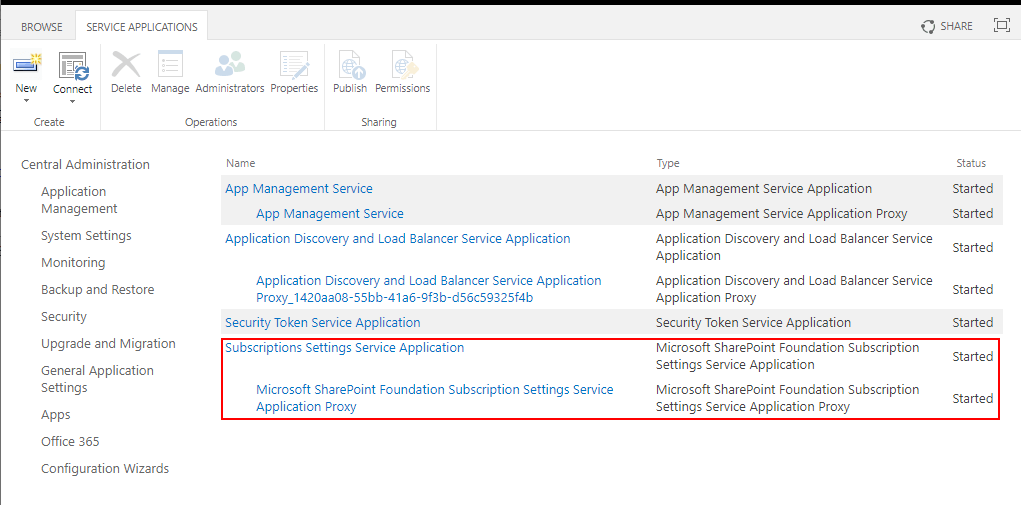
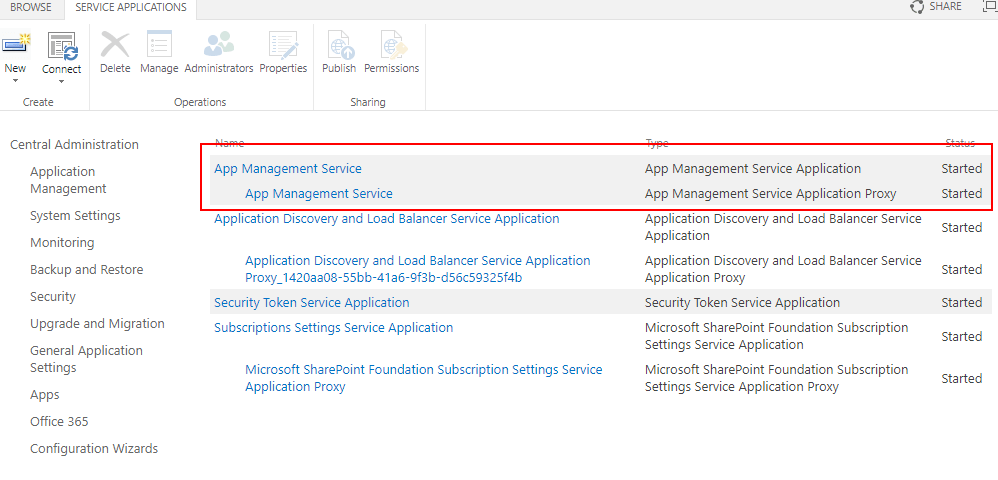
- To check if the App Management Service is already running in your farm navigate to "Central Admin" > "Application Management" > "Manage Service Applications" (under Service Applications) and check if the "App Management Service" is listed and in the running status (see screenshot below):
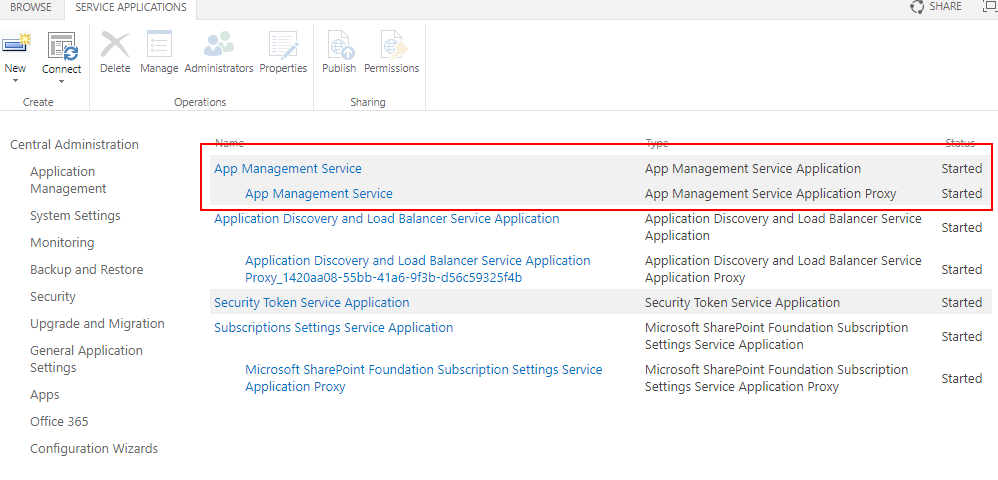
- If the "App Management Service Application" and "App Management Service Application Proxy" are listed with the status of "Started", then proceed to the next section.
- To add a new App Management Service, click "New" and then "App Management Service"
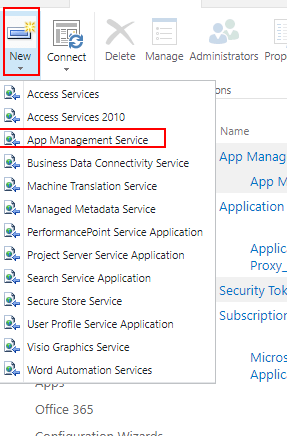
- Type a name for the service application
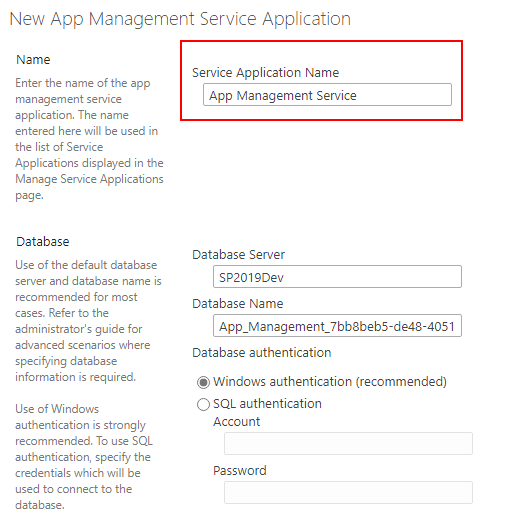
- Under Application Pool, choose "SharePoint Web Services Default" from the "Use existing application pool list"
IMPORTANT - The "SharePoint Web Services Default" is an application pool that is automatically created when you run the SharePoint Central Configuration Administration Wizard. If you cannot see that Application Pool available then click on "Create a New Application Pool" instead and provide a new name and a service account for your application pool.
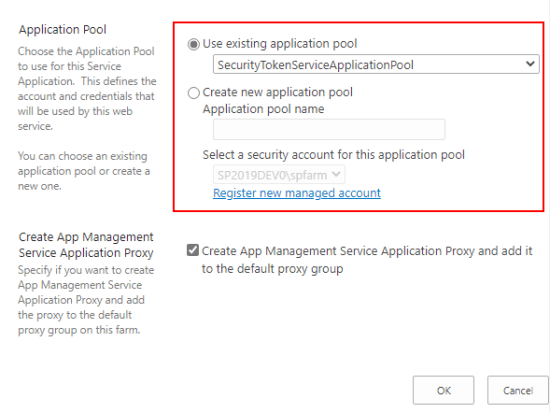
- Click "Ok"
- Once created, you should see the App Management Service and its proxy listed in the Manage Service Applications Page ("Application Management" > "Manage Service Applications" (under Service Applications))
Configure and enable Subscription Settings Service
The Subscription Settings Service needs to be running on your farm.
- To check if the Subscription Settings Service is already running in your farm, navigate to "Central Admin" > "Application Management" > "Manage Service Applications" (under Service Applications) and check if the "Subscriptions Settings Service Application" is listed and in the running status (see screenshot below):
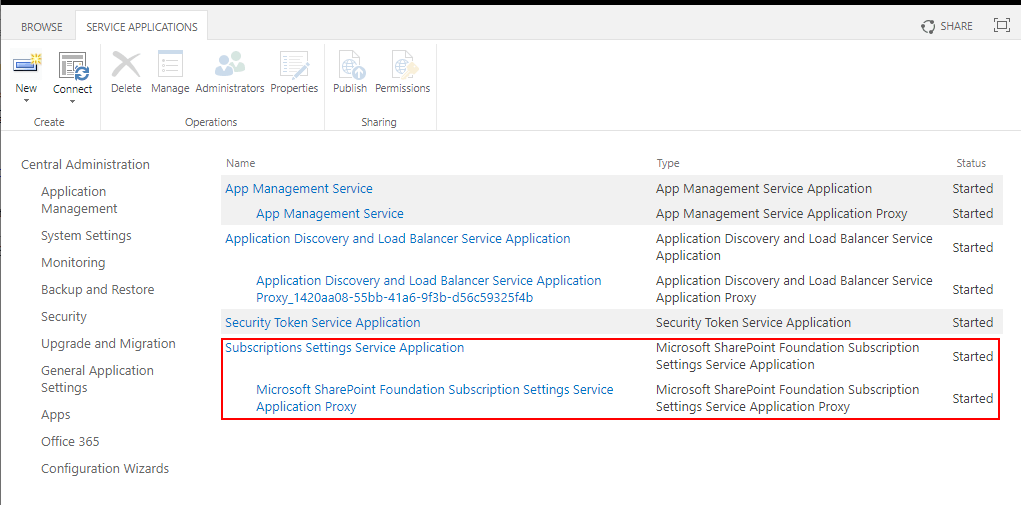
- If the "Subscription Settings Service Application" and respective proxy are listed with the status of "Started", then you do not need to proceed with the rest of instructions in this section.
- to configure the Subscription Settings Service navigate to "Central Administration" > "System Settings" > "Manage services in this farm"
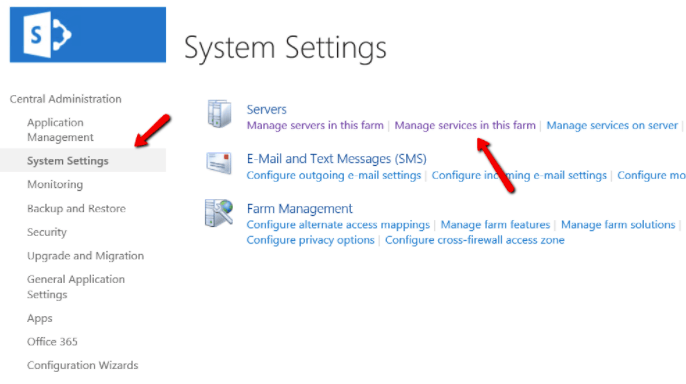
- Click on "Enable Auto Provision" for Microsoft SharePoint Foundation Subscription Settings Service

Next we need to create the Subscription Settings Service using PowerShell.
- Open the SharePoint Management Shell as administrator
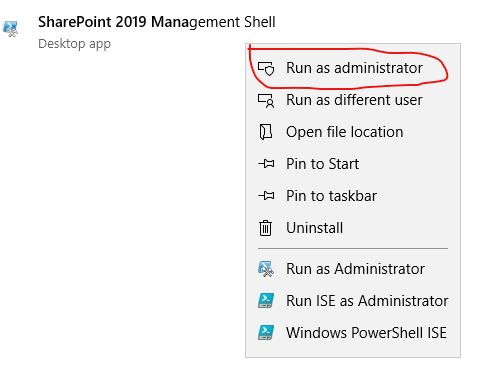
- Run the following 2 commands in PowerShell:
$sa = New-SPSubscriptionSettingsServiceApplication -ApplicationPool 'SharePoint Web Services Default' -Name 'Subscriptions Settings Service Application' -DatabaseName 'Subscription' New-SPSubscriptionSettingsServiceApplicationProxy -ServiceApplication $sa NOTE: The name of the Application Pool used must match an already existing application pool. In the example above we are using the "SharePoint Web Services Default" Application Pool that is normally created by the Central Administration Setup Wizard.

- To check that the service was created successfully navigate to "Central Admin" > "Application Management" > "Manage Service Applications" (under Service Applications) and check if the "Subscriptions Settings Service Application" is listed and in the running status (see screenshot below):
Configure App Url for Apps
The last step we need to take is to ensure that the App Url for apps is configured.
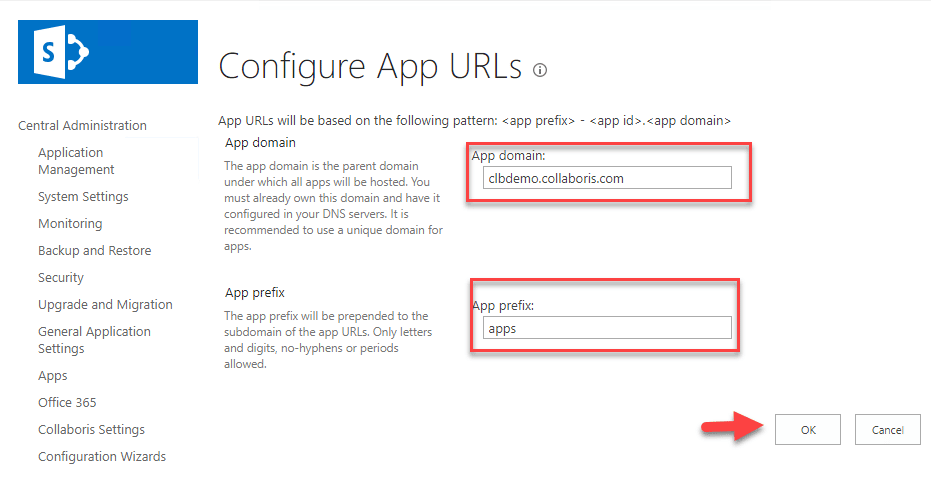
- On the "Configure App Urls page", please ensure you provide the "App domain" and the "App prefix":
Please Note:
These settings are required to ensure you can add apps to your site but they are never used by DocRead. Because of this you do not need to configure the domain you use here in DNS.
You should now be able to add SPFX apps to SharePoint.
How to add an SPFx application to the App Catalog
- To add a new SPFx App to your farm, navigate to "Central Administration" > "Apps" > "Manage App Catalog"
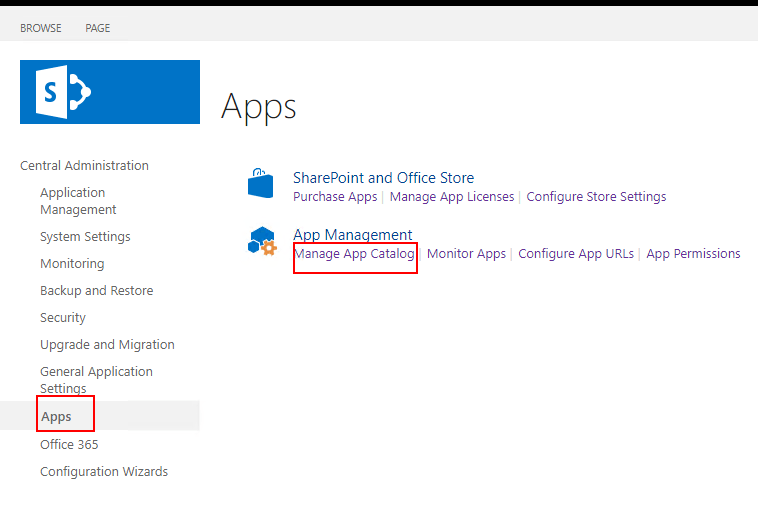
- On the Manage App Catalog page, select the Web Application where the App Catalog that you want to use is located (this needs to be the same web application containing the sites where you will want to deploy the SPFx App)
- On the App Catalog page select "Apps for SharePoint"
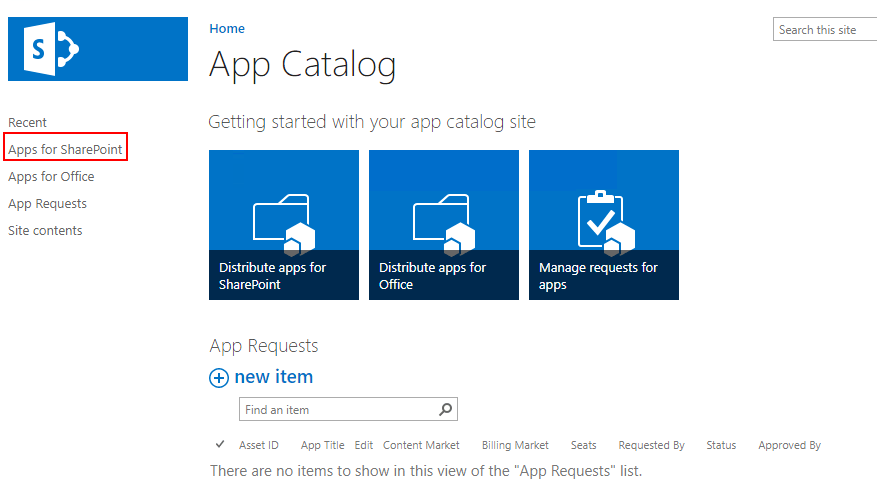
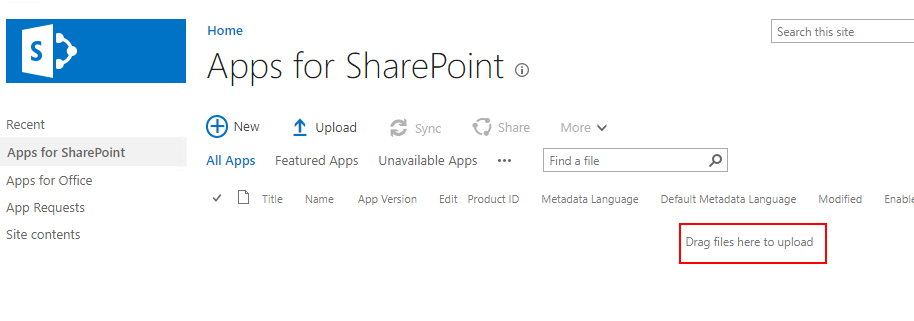
- To deploy the SPFx Application simply drag and drop the relevant "sppkg" file in the library
Is your SharePoint content read on time and by the right people?
DocRead can help
You may also like:
Creating policy review reminders in Office 365 You might want to set up a ...
Announcing the new DocRead 365 Analytics ModuleWe are thrilled to announce the release of ...
Preventing Rogue Policies in the Workplace Rogue policies are workplace policies that are not ...
10 Powerful Strategies to Boost Employee Compliance Ensuring that employees comply with company policies is ...
How to Distribute a Training Video with DocRead OK, so here's the thing - ...

