Cost Reduction Is a Leadership Skill Cost reduction is usually framed as a finance ...
How to use a ‘Link to a document’ in place of a real document in SharePoint.
Note: The information in this post relates to on-premises SharePoint only. If you want to see the equivalent information for SharePoint Online / Office365 / Microsoft 365, please go here.
SharePoint is an amazing place to store documents and important information. SharePoint documents are searchable, sharable and secure. SharePoint security ensures any sensitive information does not get into the wrong hands.
From time to time you may need to give the effect of storing documents in SharePoint, without them actually being stored in SharePoint document libraries. Maybe you have documents in external systems that you want to make available with SharePoint or you have found an interesting blog post or video that you want to share with your colleagues. Creating Links to these documents opens up a whole new world of opportunities.
Documents can be made available in SharePoint with a few easy steps using the 'Link To a Document' content type. This 'SharePoint How to' post will first illustrate how this is set-up and how to create a link. Then we will consider how to distribute that 'link' with DocRead. Using DocRead will mean that you can request that users read and confirm the document by a deadline.
So - let's get started:
Allowing external links to be created
The first step is slightly different depending on which version of SharePoint you are using:
SharePoint 2019 Modern view
Navigate to the document library where you want to add the ‘Link to document’. Select the "Cog" icon in the top right corner of your screen and then the ‘Library Settings’ option.

SharePoint 2013, 2016 and 2019 Classic
Navigate to the document library where you want to add the ‘Link to document’. From the Ribbon select ‘Library’ and choose ‘Library Settings’.

Now select ‘Advanced Settings’.

Ensure ‘Allow management of content types’ is set to ‘Yes’ and click 'OK'.

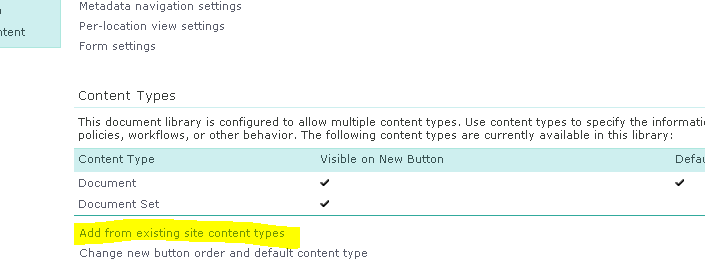
Select ‘Add from existing site content types’.

Choose ‘Link to a Document’ from the list in the left. Then click ‘Add’ to move it into the right-hand column and click ‘Ok’.

Note: you will only need to do this once per library.
Now that we have done this, we are able to add ‘Links to a document’. So let’s try it!
Creating an external link to a Document
Again, these steps are slightly different depending on which version of SharePoint you are using:
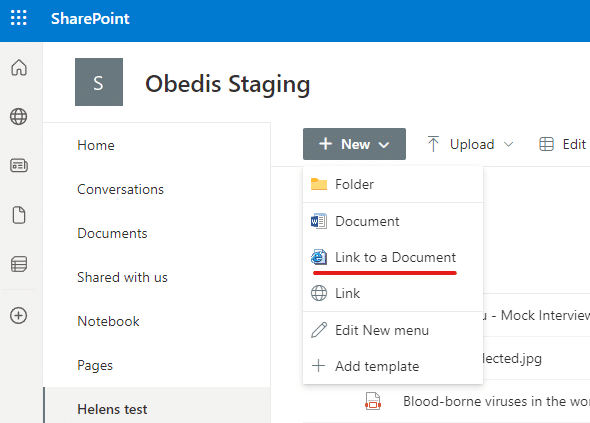
SharePoint 2019 Modern View
Firstly, navigate to the document library where you want to add the ‘Link to document’. From the + New menu select ‘Link to a Document’.

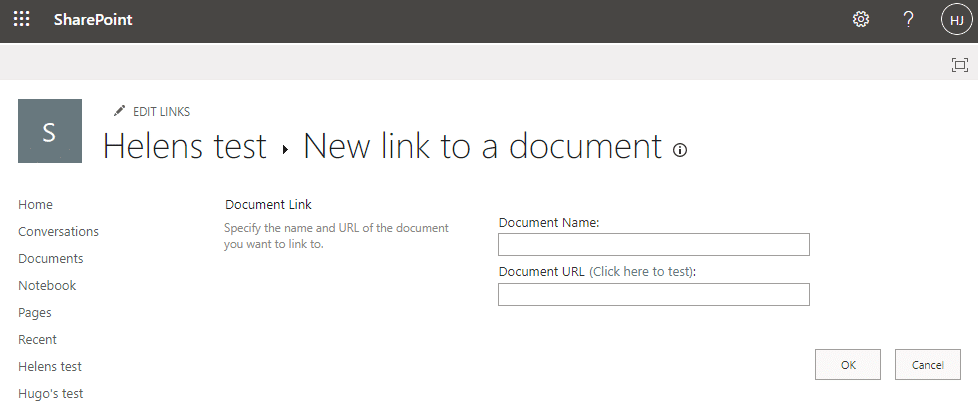
SharePoint 2013, 2016 and 2019 classic
Navigate to the document library where you want to add the ‘Link to document’. From files tab select ‘New Document’ and then ‘Link to a document’.

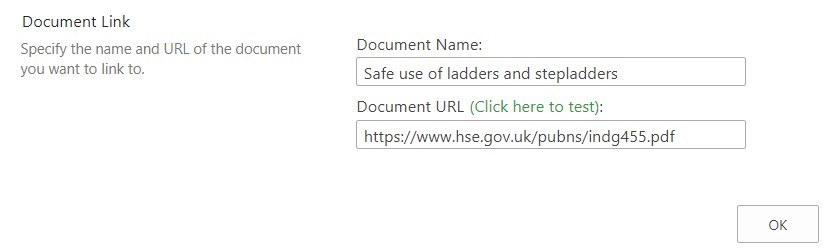
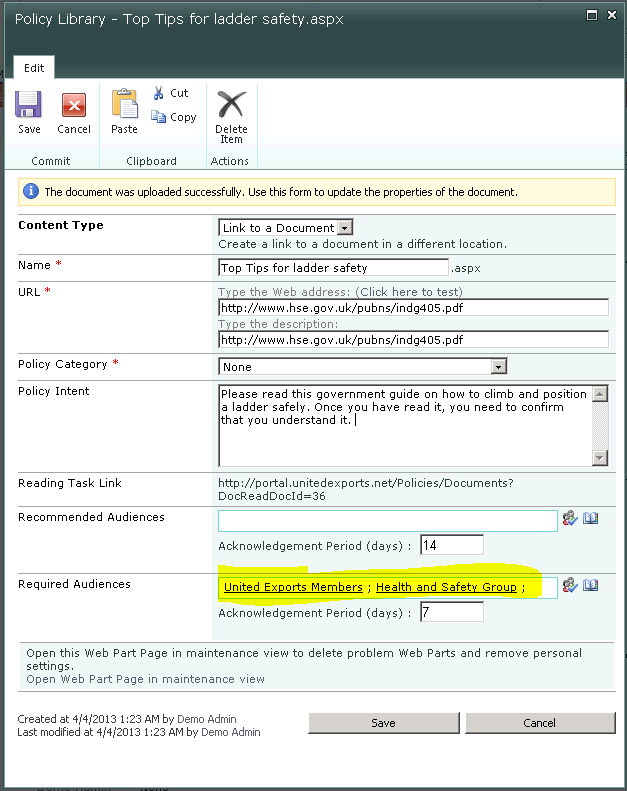
Add the document name and provide a URL (use the test option to check that it works)
Note: The URL can be *anything* such as a URL from an Internet/Intranet web page, a document in another document library, YouTube video, document in another system and so on. In fact, as long as it can be navigated to by the end-user it can be linked to and stored in your document library.
The links to documents are stored in the same libraries as your normal SharePoint documents.

Are your policies read on time and by the right people?
DocRead makes compliance simple
Using DocRead to ensure the right people read and acknowledge your document
Now you have your new link set up, you may need groups of people within your organization to read the document (or watch the YouTube/training video etc.). This can be arranged really easily using a third party tool like DocRead to assign all relevant people a task.
The first step is to ensure the DocRead properties are available in the Link to Document content types. (Note: if you are already using DocRead and have other links to documents within this library, chances are that these columns are already recognized by DocRead so you can skip to step 4).
1) From the Content Types section, select 'Link to a Document'.

2) Then select 'Add from existing site or list columns'.

3) Select 'Reading Task Link', 'Recommended Audiences' and 'Required Audiences' from the Available columns box on the left hand side. Then click 'Add' to move them into the right-hand side 'Columns to add' box and click 'OK'.

4) When you view the ‘Edit Properties’ screen for the link to your document, you will now see the Reading Task Link, and Recommended and Required Audiences elements. If not, review the last 3 steps to make them visible.
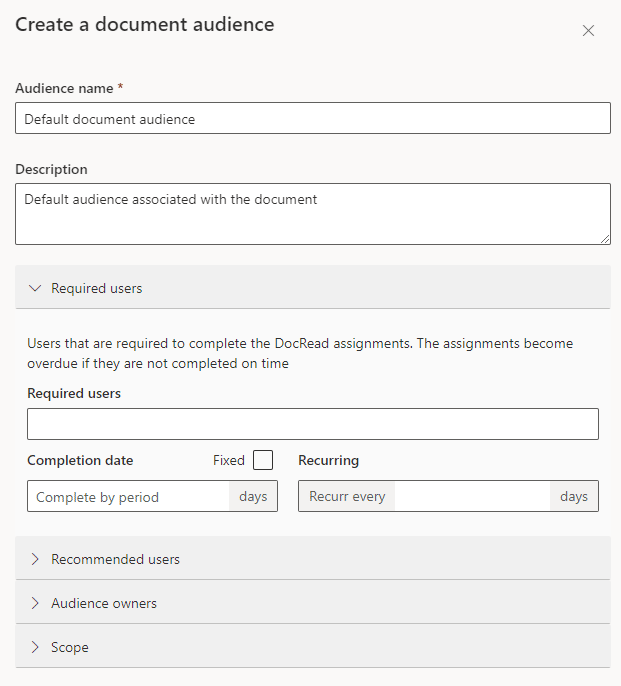
Now you can tell DocRead which individuals or groups of people need to read it. You can achieve this by using the 'Recommended Audiences' and ‘Required Audiences’ boxes. Simply choose some groups and give them a set number of days to complete the task!
DocRead steps for SharePoint 2019 modern view
In a document library that you have already activated DocRead on, select "+New" and then "Link to a Document".

Add the details of the document (or website address) that you want to create a link to.

Then access the DocRead settings for the link you have just created and set the audience you want the item to be assigned to.

DocRead steps for SharePoint 2013, 2016 and 2019 classic

Once the link is ‘Checked In’, ‘Published’ and ‘Approved’ (if workflow is enabled), DocRead will create ‘Reading Tasks’ to all of the people in the groups specified. (e.g ‘Health and Safety Group’ and ‘United Export Members’). Each person will then be given a set number of days to confirm reading the 'Top tips for ladder safety' document before it becomes overdue (in this case 7 days). Users will receive an email notifying them that they are required to read the document. In addition to this, the DocRead web part is usually placed in a prominent place in SharePoint so that users can never avoid their required reading!
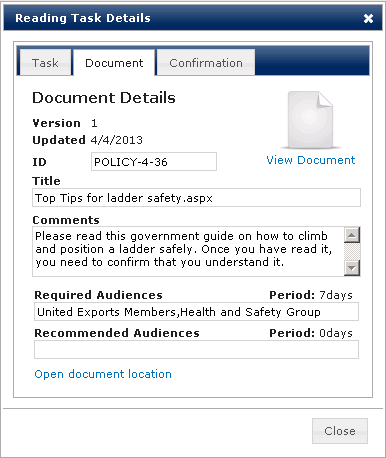
The screen below is an example of what the end user sees when they click on the new reading tasks. They can view information about the document (which is really a link), and also click ‘View Document’ to view it. So in this case, when they click ‘View Document’ a new browser window will be shown with the Ladder page on it.

Once the user is happy they have read the page, they are then required to confirm the document using the 3rd tab, by clicking the ‘I agree’ and clicking 'Confirm'

Conclusion
I hope this post has shown how easy it is to incorporate external sources of information to your environment and also how to ensure users read a document that’s initially stored outside of SharePoint.
I am sure you will agree - this is a really neat way to increase the number and types of documents that can be issued and tracked with DocRead.
Why not take a more in-depth look at DocRead by taking the tour ?
How to target and track your SharePoint content
DocRead has been helping our customers target and track their Policies, Procedures and any other SharePoint content for over 12 years.
You may also like:
ConvergePoint vs Xoralia vs DocRead: A Real-World Policy Management Comparison If your organization uses ...
"Why Managing Document Versions in SharePoint is So Hard (and What to Do About ...
Policy Approval Workflow Automated policy approval workflows offer several benefits that can significantly enhance ...
Creating policy review reminders in Office 365 You might want to set up a ...
How to Distribute a Training Video with DocRead OK, so here's the thing - ...

