The Difference Between Governance Infrastructure and Governance Theater Most organizations don’t lack governance. They ...
How to link fields in a document to an O365 library
Linking fields in a word document to a document library can save time and also ensure consistency of reporting. This technique is really useful for Policies amongst other use cases. This post will provide the step-by-step instructions you need to follow to link fields to Office 365.
Enable content types
Before you can begin to create your own content types, you must first allow the management of content types in your O365 library.
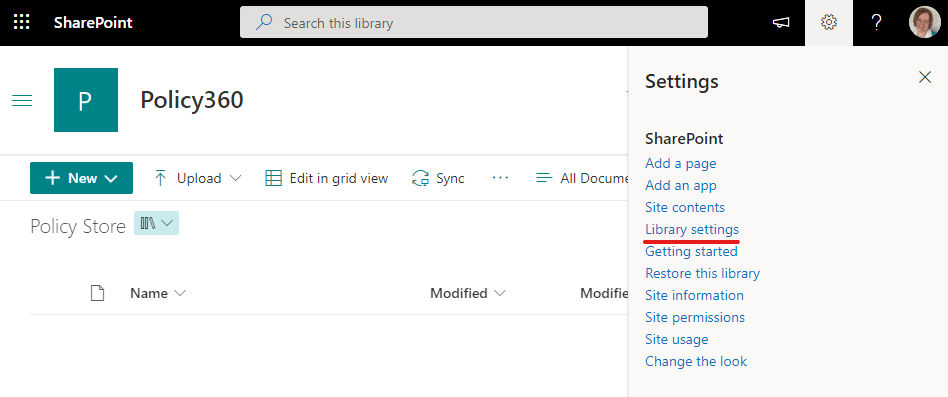
1) In your preferred document library, click the cog icon to see the settings, then select "Library Settings".

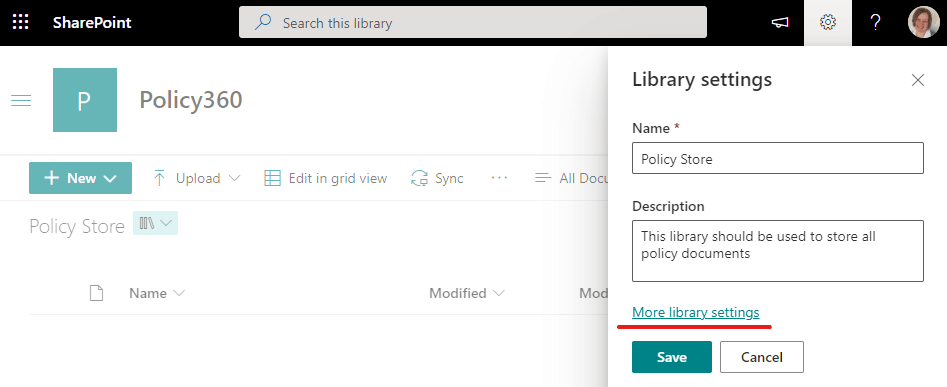
2) Followed by "More library settings".

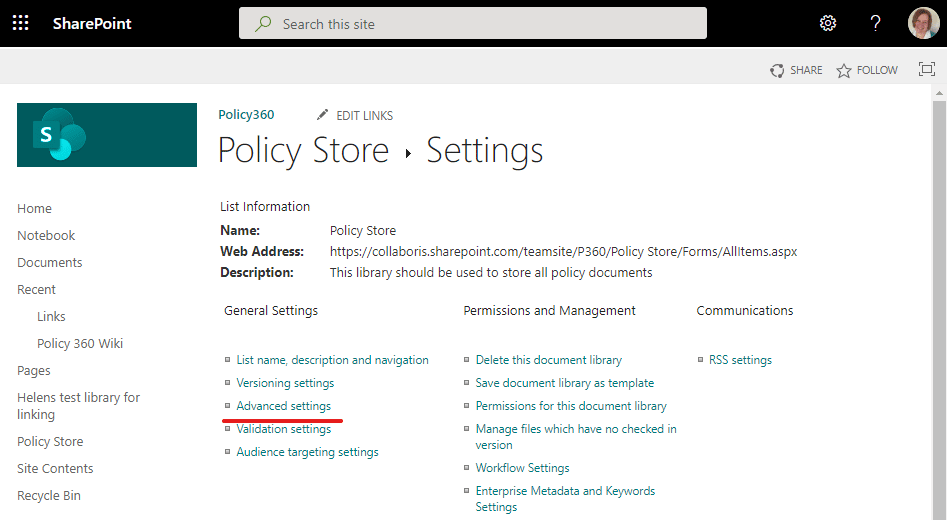
3) From the Library Settings menu, select "Advanced Settings".

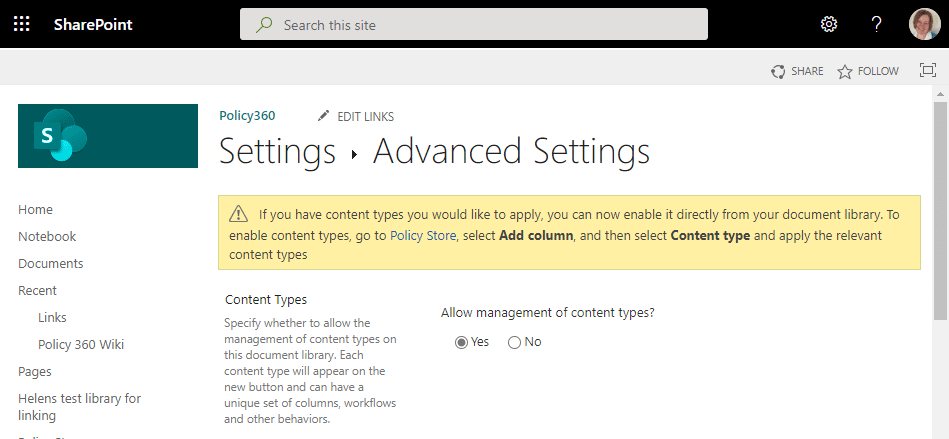
4) Then select "Yes" to allow management of content types.

Free downloadable policy document
Download our free MS Word policy template and follow the steps below. Alternatively, you can use your own template if you already have one.
Create a new content type for your linked fields
Now you can create a new content type for the information fields you want to link from your document to Office 365. Creating these in a new content type means that they can be reused in other sites and document libraries. This ensures consistency across your site, because when a user chooses to create a new document, you can ensure the required fields are used.
1) Sign into the SharePoint admin center using an account that has admin permissions.
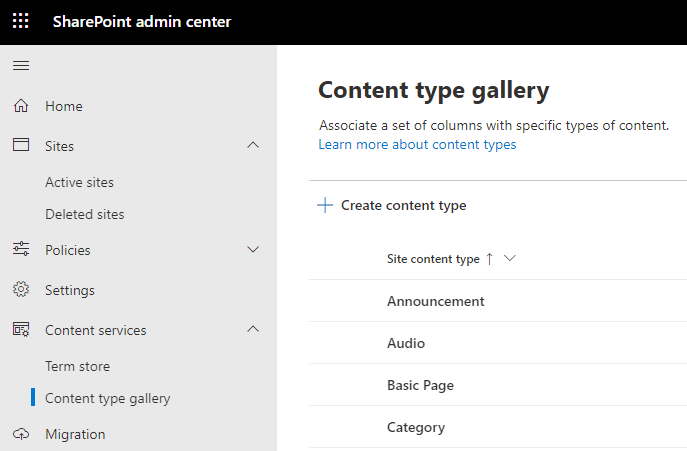
2) Expand the content services menu item and go to the content type gallery.

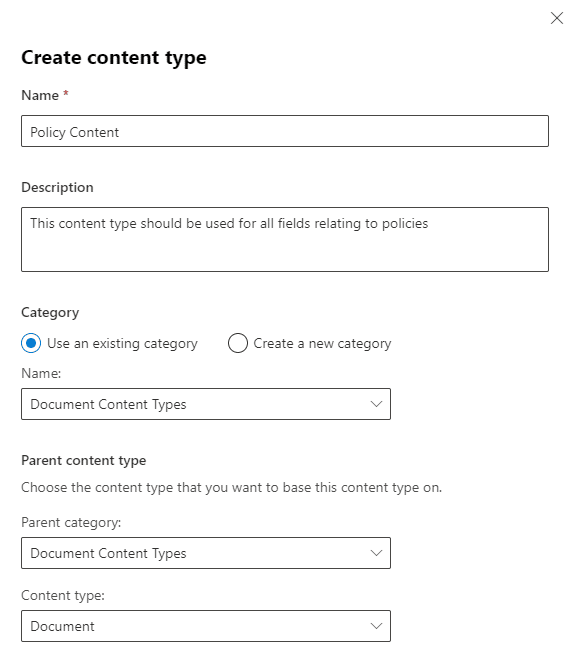
3) Select "Create content type", give your content type a unique name and add a description. Select the remaining options as shown below.

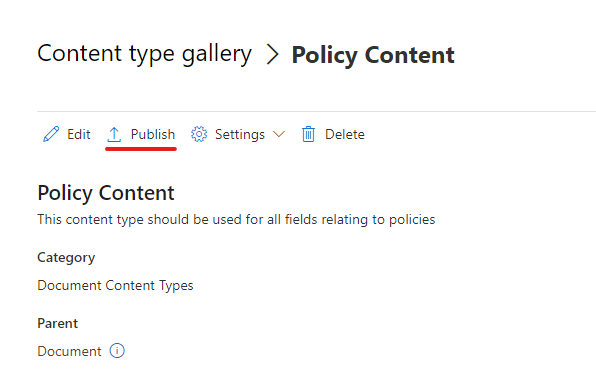
4) Click "Create" to create your new content type.
5) You also need to publish the content type so it can be used across your sites.

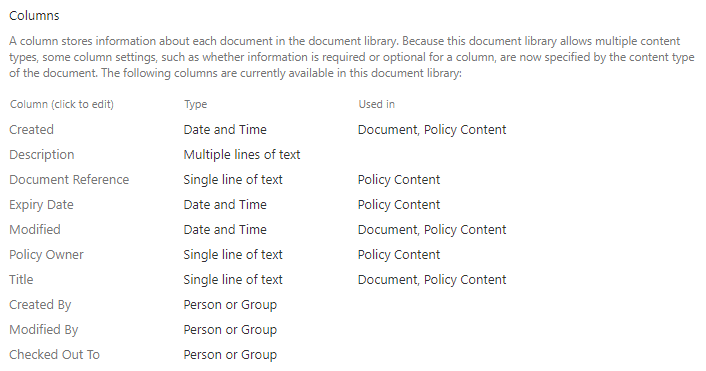
Create new columns in your content type
After you have created and published your new content type, you can begin to create the columns that you want to include in it. Each field you want to link from your document to Office 365 needs to have a column.
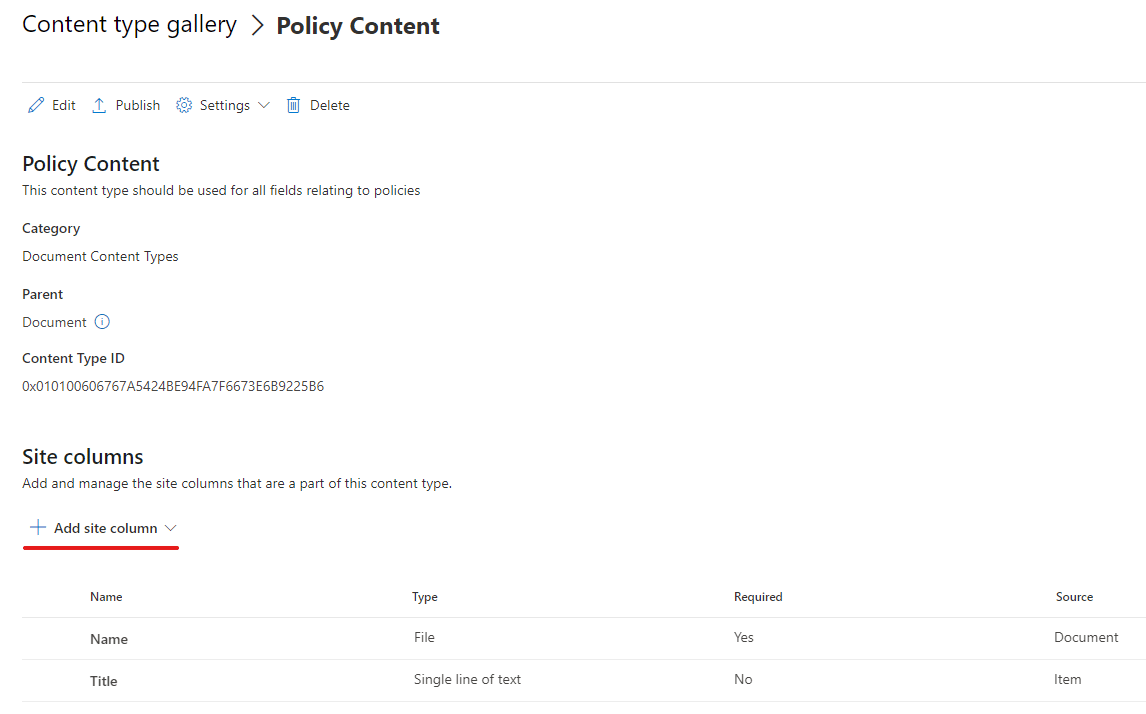
1) Use the "Add site column" option to add the columns you want.

2) Add the following columns and remember to use the correct data type (date/time, text etc.)
Document Reference | Effective Date | Document Owner | Last Modified By |
Document Name | Expiry Date | Next Review Date | Last Modified on |
Version | Cell | Cell | Cell |
NOTE: We are using our own version number field here instead of using the default SharePoint version number. The reasoning for this is that we want to fully control when the version changes and guarantee that, for every version, there is an entry in the "Review History" section of the policy with a justification for the change.
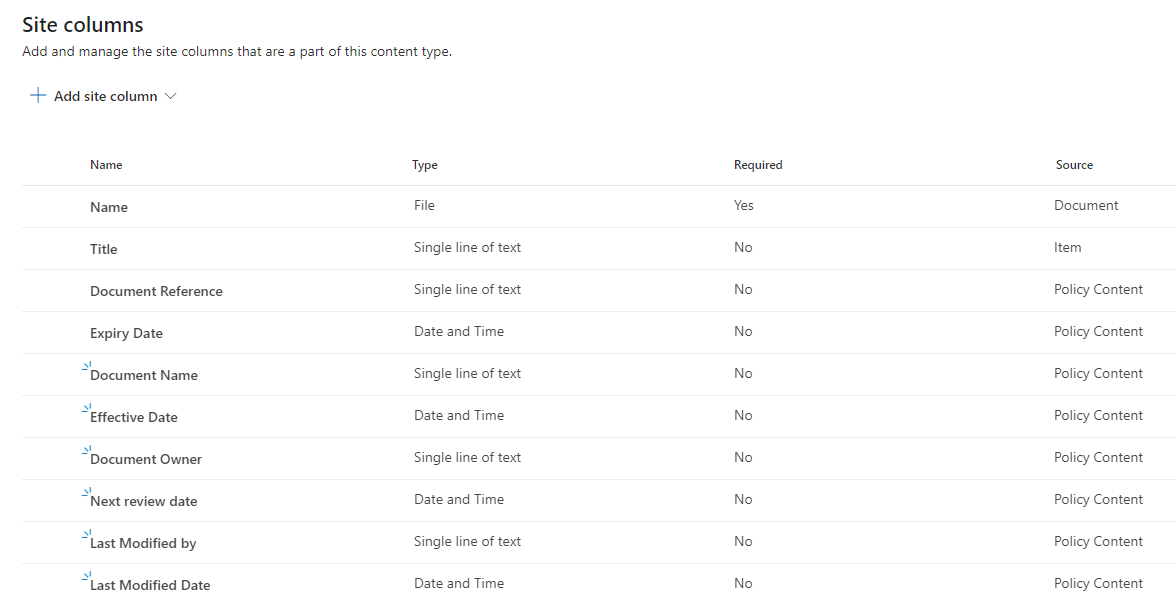
3) After you have added all of the columns, you should be able to see them all listed as below:

Free downloadable policy document
Download our free MS Word policy template and follow the steps below. Alternatively, you can use your own template if you already have one.
Add the new content type to your library
Next you need to add your new content type to your Policy library. This will allow the content type to be used within the library and the fields linked to O365 documents.
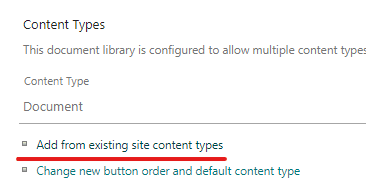
1) Go to your library, use the cog (top right corner of screen) to go to "Library settings" and "More library settings" then chose "Add from existing site content types".

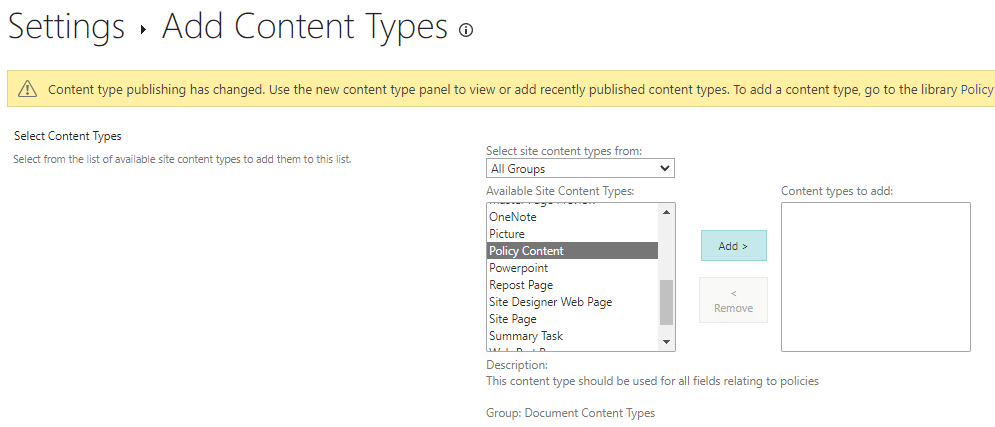
2) Scroll down the list in the "Available Site Content Types" until you find your new content type. Then click the "Add >" button to add it to your site.

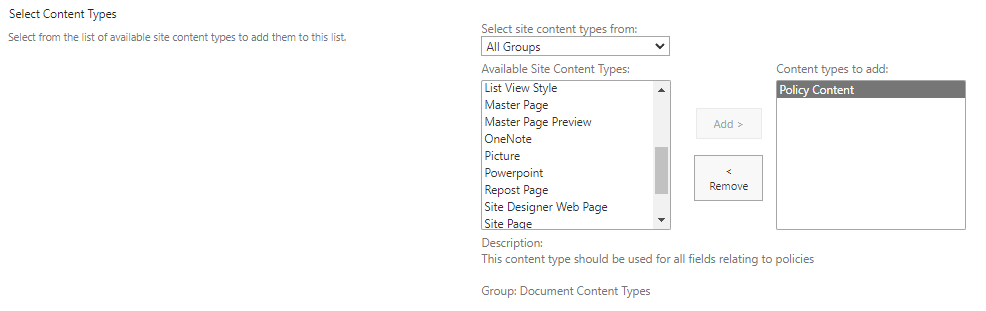
3) Your content type should appear in the right hand "Content Types to add" box click OK.

4) Adding the content type to the library will make the content type columns available on the library. Check the columns you added can be seen in the library settings page.

Link the document fields in your policy to the content type columns
Now you have created all of the columns you need in your document library, you can link them to your MS Word policy template. For this example, we are going to be using our sample policy template that you can download here.
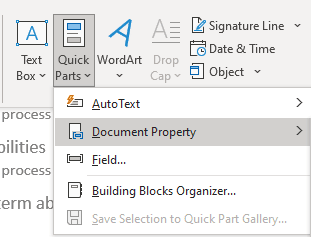
1) Make sure your policy template is saved in your document library, then open it in the Word App (not in Word online).
2) In the Word template, select the text that you want to link to the SharePoint field. If you are using our policy template, to make life easier we highlighted all the text fields that can be linked to SharePoint in yellow.
3) From the MS Word top menu select the "Insert" ribbon and then select "Quick Parts" and "Document Property".

A list of all the available document properties will be shown, select the relevant option that relates to a column you created earlier in this process.
3) Repeat this process until you have linked all of your data fields. If you are using our free downloadable template, you will need to have linked the following fields:
Document Reference | Effective Date | Document Owner | Last Modified By |
Document Name | Expiry Date | Next Review Date | Last Modified on |
Version | Cell | Cell | Cell |
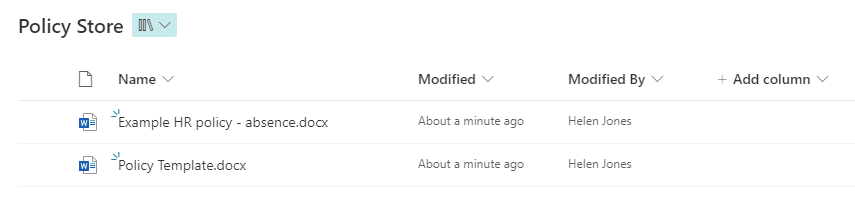
Check the document links work
It's important to check that the links from your document to Office 365 work as expected. You may find it easier to display the columns in your SharePoint library view so you can see the data in them. Use the "+Add column" option as shown below to display them.

1) First, change some of the linked text in your policy document (remember to save the policy) and check that it updates the correct fields in your document library.
2) Secondly, update some of the column information in your document library (it's easier to do this in the grid view). Remember to exit the grid view for your changes to be saved. Then open your policy in the Word App (not in Word Online) and check that your changes are reflected.
Take your Policy Management to the next level
Our DocRead software helps organizations simplify and improve their compliance processes. So, if you want to take your policy management processes to the next level, then please get in touch and we will be happy to help.
Are your policies read on time and by the right people?
DocRead makes compliance simple
Collaboris has helped guide and advise companies for over 15 years and is committed to continue to do so. We are passionate about helping organizations improve their policy, procedure and SOP processes. Our DocRead software helps organizations simplify and improve their compliance processes. Also, our free guides and resources can help whether you are looking to revolutionize your policy making processes, improve your internal communications or purchase policy management software.
You may also like:
June 19, 2026
June 5, 2026
The Difference Between Governance Infrastructure and Governance Theater Most organizations don’t lack governance. They ...
May 29, 2026
The Difference Between Governance Infrastructure and Governance Theater Most organizations don’t lack governance. They ...
May 22, 2026
The Difference Between Governance Infrastructure and Governance Theater Most organizations don’t lack governance. They ...
May 15, 2026
The Difference Between Governance Infrastructure and Governance Theater Most organizations don’t lack governance. They ...
May 8, 2026
The Difference Between Governance Infrastructure and Governance Theater Most organizations don’t lack governance. They ...