Policy Approval Workflow Automated policy approval workflows offer several benefits that can significantly enhance ...
How to support multiple versions of SharePoint in a single Visual Studio solution
If you are ever tasked with having to support more than one version of SharePoint in a Visual Studio Solution (e.g SharePoint 2010 and SharePoint 2013), then this post will hopefully be of some help!
Before I get started – if after reading this – you like it – please share or link to it. It all helps to spread the word! Also, if you have any other tips, use the comments at the bottom.
Firstly, why would you need to this?
- You could be a software vendor (like us) that sells software that runs against one or more versions of SharePoint. We develop DocRead for SharePoint which runs on all 3 versions of SharePoint. Maintaining 3 code bases would be expensive.
- You could have more than one version of an application in your organization. The bigger the organization the more likely this is. For example, a multi-national may have SharePoint 2007 in Europe and SharePoint 2010 in the USA. To migrate Europe to SharePoint 2010 could take years, meaning the custom application will need to work in both versions.
Why not just copy the code ?
This is bad – if you find a bug, you need to fix it in two places. If you need a new feature, it needs to be developed and tested in 2 places. At all costs try and avoid this if you are going to be supporting both installations for anything more than a few days.
So, let’s get started – follow these steps to find out how we do it at Collaboris.
Create new solution configuration’s in Visual Studio
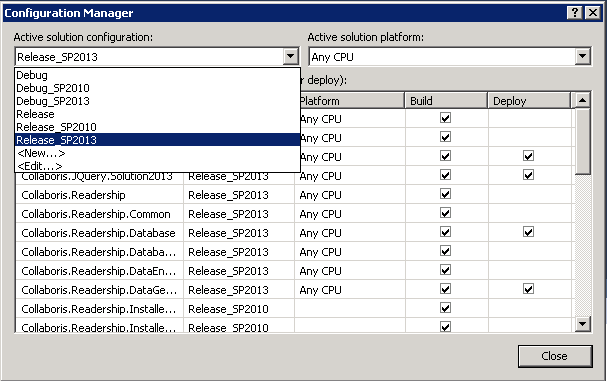
Open your existing Visual Studio Solution (which supports the older version of SharePoint) and add 2 new solution configurations. Let’s assume you already have a SharePoint 2010 solution and now want to support 2013. Call the configurations something meaningful, such as …
- Release_SP2013
- Debug_SP2013
Once this is configured you should end up with this :
Doing this allows us to use ‘Conditional Compilation Symbols’ against each new configuration. (More on this later).
BTW – the reason we have ‘Release’ and ‘Debug’ is because we do different tasks on each one. For example, we run code analysis (using StyleCop) and unit tests on ‘debug’ and obfuscate our code on ‘Release’. The debug build also won’t be optimized and is generally only for development purposes.
Create new Visual Studio SharePoint projects
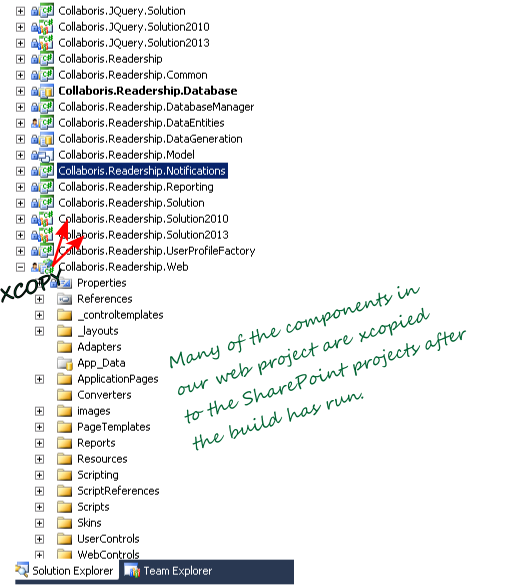
If your current solution contains one or more Visual Studio SharePoint Projects you will need to copy them and create new SharePoint 2013 versions. To do this, copy the entire folder containing your *.csproj using windows Windows explorer, rename it and then add the new project to the solution. In the example below we have 3 SharePoint projects (one for 2007, 2010 and 2013).
Isn’t this duplicating code ?
Yes. We originally tried to maintain all we needed in one single SharePoint project. However, as soon as you want to take advantage of any new SharePoint features (available in the newer version) you can’t. You also need to have post-build scripts that modify the WSP. In short, it’s messy.
Having said that, we don’t duplicate a great deal as we have a post build commands that ‘XCOPY’ all of our user controls, images, Javascript, CSS, resources, pages and so on, from a master ‘web project’ to each of the Visual Studio SharePoint solutions. In fact the only thing that’s separate for each version of the project is the Feature and Package configuration.
We trigger our XCOPY commands from our master web project (“Collaboris.Readership.Web.csproj”) as a post-build event as below :
What about the hardcoded versions in your ASCX and ASPX?
You will also notice that in your ASCX’s and ASPX’s you will have references to a particular version of SharePoint. e.g.
<%@ Register Tagprefix=”SharePoint” Namespace=”Microsoft.SharePoint.WebControls” Assembly=”Microsoft.SharePoint, Version=12.0.0.0, Culture=neutral, PublicKeyToken=71e9bce111e9429c” %>
The good news here is you don’t need to change them! Microsoft already use Assembly Binding Redirects to redirect yuor references to the latest SP Dlls. Read this article for more information : http://sadomovalex.blogspot.co.uk/2011/09/assembly-binding-redirect-in-sharepoint.html
Conditional compilation
If you don’t know what conditional compilation is, check this out. Conditional compilation is cool because it lets us do things like, add logging code for a ‘Debug’ build or more importantly build code that is specific to the version of SharePoint based on the active configuration.
To get this working, we are going to need to add new symbols for both our ‘Release_SP2010’ and ‘Debug_SP2010’ configurations.
We also have the same for 2007.
Now this is done – we can now use the symbols (“SP2007″, “SP2010″ and “SP2013″) in code as such :
In the code sample (above) only the first will be built and compiled into both of SharePoint 2013 builds (debug and release). For 2007 and 2010 the 2nd line will be compiled (in light gray).
This is fantastic because it’s now really easy to write code that is specific to a particular version of SharePoint. For example, if Microsoft decide to ‘obsolete’ a feature then you will want use the new way, which is what’s happening above.
.Net 4.5 or .Net 3.5
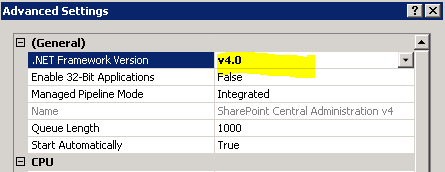
As you may know, SharePoint 2013 now uses .Net 4.5, so your App Pool will be configured as such …
This means that you should compile your custom assemblies against the .Net 4.5 framework (not .Net 2.0 or .Net 3.5, depending on your earlier versions). This also means you can start to take advantage of the latest and greatest from .Net while still maintaining one code base.
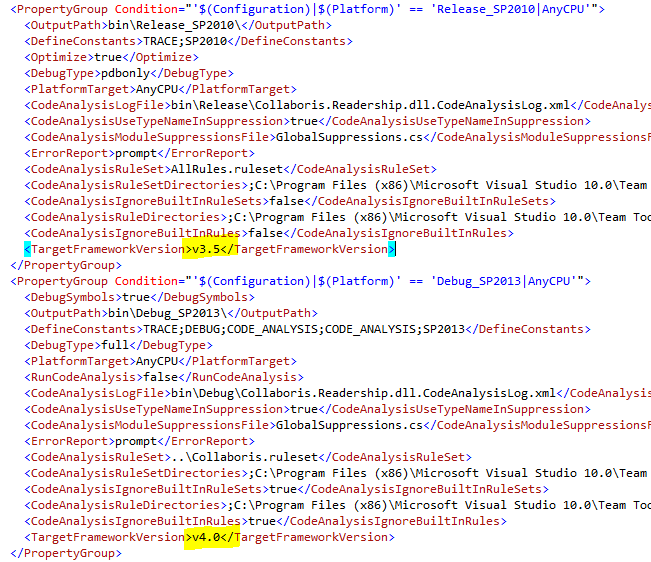
Unfortunately, the visual studio IDE doesn’t give you a way to conditionally target a framework version based on a conditional compilation symbol, however, this can easily be achieved by editing the MSBuild XML for the project.
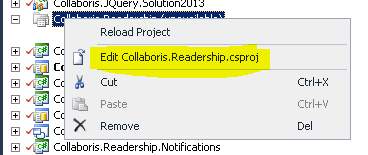
To do this, click on ‘Unload Project’ ..
And ‘Edit …. *.csproj ’
Once that’s done you should now be editing MSBuild XML that describes the make-up of your project.
In this file you need to ensure you add a ‘TargetFrameworkVersion’ and set it to ‘v4.0’ for both the ‘Debug_SP2013‘ and ‘Release_SP2013‘ configurations.. Do this for all projects in your solution that need to support more than version of SharePoint. It can take a few minutes to do, but it’s a one off.
Update : Although SP2013 projects compiled against .net 4.0 will work. you should ideally use .Net 4.5 so you will need to use Visual Studio 2012.
Conditional Assembly References
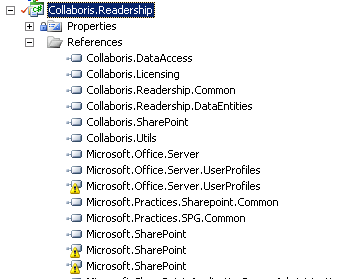
You may also find that you need to add a different (or new) version of an assembly if it’s 2013 but not if its 2010. If you reference that assembly in the 2010 build (built against an earlier version) it will break. So how do you do it? You can also achieve this in pretty much the same way. Edit your “*.csproj”
The lines above cause the correct version of the Microsoft.SharePoint.dll to be loaded depending upon the configuration in use (2007, 2010 or 2013).
This does cause a yellow warning symbol to show in the IDE but don’t’ worry about that – it’s harmless.
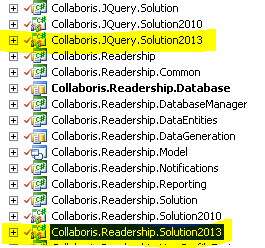
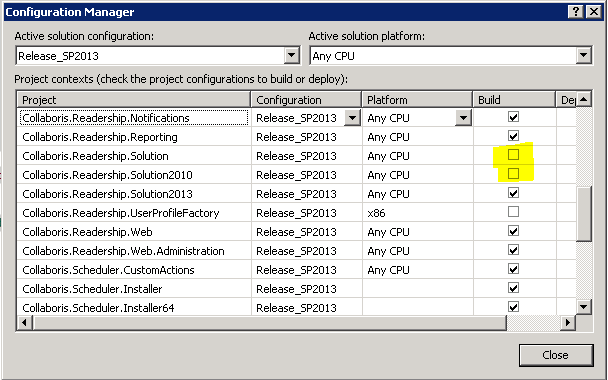
Exclude projects that shouldn’t be built for the active configuration
One other important step is to exclude projects that shouldn’t be built for that configuration. For example, If you are building for “SharePoint 2013” in “Release” mode then you don’t need to build the SharePoint projects that are specifically for SharePoint 2007 or SharePoint 2010. In fact, if you do it is highly likely this will cause an error.
Ours looks like this:
How to build for all versions on one build machine
When we check our code into TFS a new build is triggered. This results in the creation of 3 MSI’s (one for each version of SharePoint). We manage to do this all with one build server. To achieve this though, you will need to have all 3 ‘hives’ copied onto the build server. You will also need to make sure your assembly references pick the assemblies from these paths, (not the GAC).
Obfuscation with Smart Assembly
One final point to make is around obfuscation. We protect all of our code from being reversed engineered in tools like .Net Reflector or ILSpy. To do this we use SmartAssembly from Redgate.
Many of our SmartAssembly settings are different based on the version of SharePoint that’s being built, so we need to load in a different SmartAssembly project as a post build task. To cater for this, we edit the MSBuild XML as follows.
You can do any carry out any other version specific post-build tasks in this manner.
You may also like:
January 17, 2025
January 7, 2025
Creating policy review reminders in Office 365 You might want to set up a ...
July 2, 2024
How to Distribute a Training Video with DocRead OK, so here's the thing - ...
April 28, 2024
Creating links to external content in Office365 From time to time you may need ...
March 30, 2024
How to Add Users to a SharePoint GroupThis blog post explains how to add ...
October 13, 2022
How to link fields in a document to an O365 library Linking fields in ...

