Standard Operating Procedures - A complete guideStandard Operating Procedures (SOP) are key to many ...
Build a policy lifecycle solution with SharePoint and Microsoft 365 - Part 1

Using the in-built features of SharePoint and off the shelf “no-code solutions”, it is possible to move from “out of the box” SharePoint to a fully featured Policy Management solution in a relatively short space of time.
Ultimately, the decision to create a policy management solution for your organization rests with you. You may be compelled to develop bespoke solutions or buy in full scale, all singing and dancing software to support the requirement.
However, it may also be the case that you are looking to limit wastage, under-utilized software and above all, development time and you are looking to create something that “just fits”.
In either case, we hope this paper will help you and support your decision making process. This white paper guides you through the key areas of consideration. It highlights the skills you may need and points out the areas that we recommend you pay most attention to. We hope the end result is an informed decision and some new areas to think about when creating your ideal Policy Management solution.
How to create a policy lifecycle solution with SharePoint and Microsoft 365 - series
- Research and create (this post)
- Collaborate and approve
- Target acknowledge and track
Overview
SharePoint Server is the fastest growing product in Microsoft company history, which is very impressive coming from such a diversified software maker powerhouse.
According to Association for Intelligent Information Management (AIIM) over 90% of organizations are using Microsoft 365 in some fashion. Many of these organizations are either in the process of moving their documents to SharePoint or have already done so. With documents stored in SharePoint it makes a great deal of sense to build business processes and workflows, (such as policy management), on top of them. Doing this removes the need to duplicate and manage them in 3rd party systems outside of SharePoint. Additionally, this can minimize any versioning, maintenance, storage and security problems of holding documents in multiple places.
One of the problems companies face is engaging experienced and knowledgeable SharePoint personnel. SharePoint can be a complex system to comprehend. Business users may struggle to explain their needs for a capable policy management solution in terms a SharePoint developer/designer can build upon, and conversely, it may be hard for a SharePoint Developer to explain why having a robust security model and not just a solid workflow might be relevant to their customer.
Both conversations will be equally correct. The challenge is investing the time and energy to reach a practical solution to the business problem.
This document describes how business users and power users can use and extend SharePoint with both built-in features and off-the-shelf tools to provide a comprehensive policy management system. It aims to enable more cohesive and confident conversations with SharePoint developers or power users.
Policies and procedure creation in SharePoint
You may be reading this document for a number of reasons. To allow us all to follow the same path through it, we have chosen to begin with a document that your organization wishes to collaborate upon and then ultimately distribute to a group of people.
This document may be a policy, procedure, an announcement or a video. In many senses, it doesn’t matter because you can apply the basic principles within this white paper to anything that is stored securely in SharePoint. Let’s assume for the sake of a case study, this item is a Policy Document.
Policies or procedures can be required for many reasons, such as external regulation and employee safety. Additionally, they can be used as general statements about how the organization expects its business to be conducted.
The reason for requiring such a document will vary. However, the process we follow in many cases remains the same.
The diagram below illustrates how we recommend you create your documents.
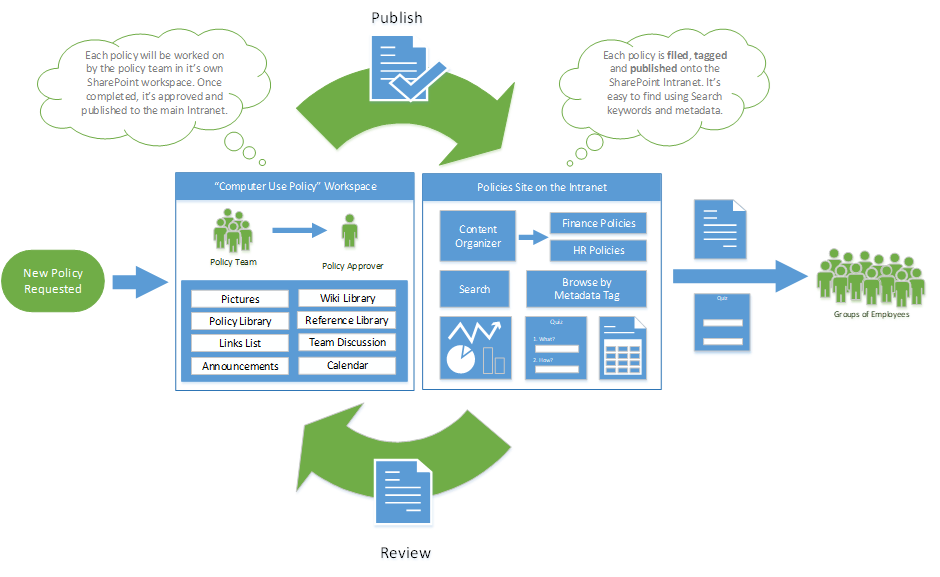
Whilst it might look daunting, the steps above can be broken down into relatively simple components.
1- Research and create
- A new policy is requested (or amendments requested to an existing policy)
- A SharePoint team site is provisioned to be used by the policy team to create a new policy or amend an existing one.
2- Collaborate and approve
- The Policy team use the inbuilt SharePoint collaboration capabilities
- A final approved policy is published into a Policies and Procedures Portal where it can be read by all employees
3- Target, acknowledge & track
- The policy is targeted at relevant employees
- It’s readership and acceptance of the content is monitored and reported upon
This process is cyclical and depending on the feedback received may result in immediate revisions or scheduled longer term reviews. In either case the process simply starts over again. More details about each stage can be found in the remainder of this document.
Tired of reminding staff to read your company policies?
DocRead makes compliance simple
1- Research and Create
The main activities in this initial stage surround the creation of a new policy or amending an existing policy.
Policies will be created collaboratively and hosted in a “Policy Workspace Site”. This will provide a secure and auditable environment for everyone involved in creating a new policy. A top-level “Workspace Directory Site” should also be available to provide easy navigation and access to individual “Policy Workspace Sites.”
With the introduction of SharePoint modern experience Hub Sites, we recommend creating the 'top level' Workspace Directory site as a hub site, with the individual Policy workspace sites connected to the hub site instead of being sub sites.
For more information on hub sites please check this Microsoft learn article:
Planning your SharePoint hub sites - SharePoint in Microsoft 365 | Microsoft Learn
Workspace Directory Site

A centralized ‘Workspace Directory’ (see diagram above) should be created as a Hub Site to provide easy navigation, search and access to all policy workspace sites where policies are being worked upon and it should contain general information to help the policy teams create company policies.
Each of the Policy Workspace sites associated to the Workspace Directory Hub Site will have its own set of permissions to ensure that only the team members responsible for the creation of each policy will have access to them.
The site should not contain any information relating to the specifics of an individual policy or procedure. These policies will be created and collaborated upon in their own dedicated SharePoint workspace site in the next stage.
Key Components of the Workspace Directory Site
Workspace Directory Site” can be created in just a few minutes and is based on the SharePoint standard team site template. It could contain (but is not limited to) the following items:
- Policy Workspaces Directory list: This list is used to maintain a single summarized directory of information about the status of each ‘policy workspace’ site. Every time a new policy or procedure workspace is introduced, it should be added to this list to ensure that the policies team is kept aware of its existence and status.
- Contacts list: List of contacts responsible for managing the organisation's different policies and procedures processes.
- Documents: A standard SharePoint document library used to store and share documents related to the management and coordination of all policies. For example, this may contain a ‘Policy on Policies’ document (also known as a Metapolicy), or guidance on how to write and structure each policy. SharePoint Alerts can be used on this library to alert users (via email) when documents are added or amended.
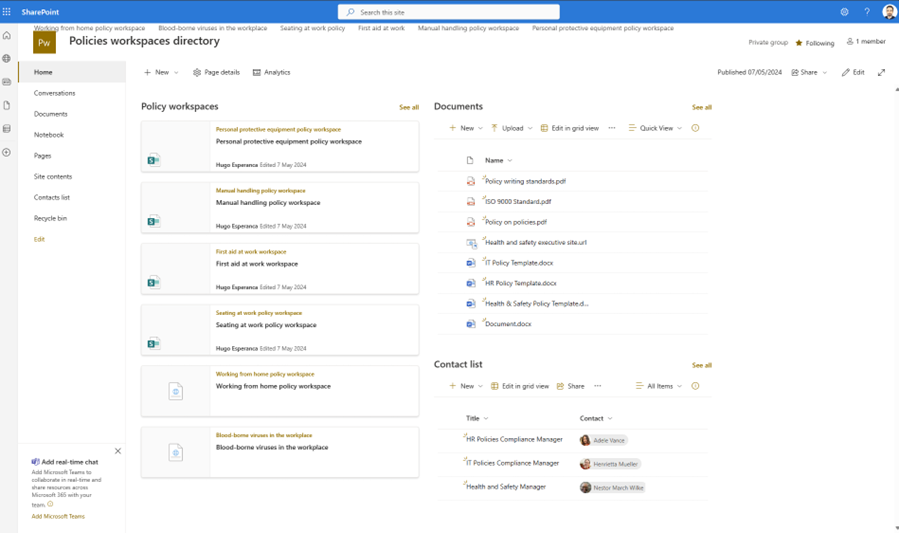
The above example of a "Policies workspace directory" home page was created with the following SharePoint web parts:
- Policy Workspaces: The "Highlighted Content" webpart displays the list of all sites in the hub. The list is security-trimmed by default so that users can only see the sites for which they have permission.
- Documents: Out-of-the-box document library web part displaying the contents of the documents library
- Contacts list: This is an out-of-the-box list web part displaying the Contacts List. It was created as a standard SharePoint list with a Title Column and a "Person and Group" column for the Contact column.
What is a Policy on Policies (also known as a Metapolicy)
A Metapolicy is a policy that governs how policies are written, approved, managed, communicated and maintained throughout the organisation.
You can find more information about Metapolicies here: What is a Metapolicy
Benefits of the Workspace Directory Site
By creating a central site overseeing all policy and document creation, you gain many advantages including:
- Policy status easy to review, control and manage
- Centralized store for information
- One point of reference
- Data security
Set permission levels to ensure that only relevant 'policies and procedures' team members can access, view, and amend the information contained within it..
The Policies and Procedures team members may need to be split into three groups.
Site Owners:
These are administrators who are responsible for and can make changes to the structure or design of the site. They can perform any task on the site, such as adding sub-sites, creating lists, and libraries and managing user permissions. These users should be trained in SharePoint site administration.
Site Members:
This group will consist of the majority of the team members who can contribute to the site. For example, they can add and amend documents, create lists, participate in discussions, and add web pages.
Site Visitors:This group should contain users who are not required to contribute to the project, but who need to be able to view items such as documents, pages, tasks, and discussion topics.
Policy Workspace site
The primary objective of a Policy Workspace Site is to provide a secure, collaborative environment where all policy stakeholders can jointly develop or revise policies. Each policy should have its own dedicated Workspace Site.
Store all documents and related materials for a specific policy within its respective Workspace Site to streamline management and future updates. This centralized approach ensures that all supporting documentation, along with a comprehensive record of decisions made during the policy's creation and maintenance, is kept together. While the content may vary, the basic structure of these workspaces will remain consistent across different policies..
Creating a different workspace for each policy has the benefit of allowing different Permission levels to be set for each policy. This means that you can ensure that only people working on the specific policy can have access to the documents and information relating to that policy, which are ‘ring-fenced’ within that workspace.
Once the policy is finalized and approved within its workspace, it can be sent to the main ‘Policies and Procedures’ site, where it can be published and communicated to staff who need to adhere to it.
Policy Workspace Template
The most efficient way of creating multiple copies of the same workspace structure is by creating a Policy Workspace Template, which (once configured to your organizational needs) can simply be duplicated as each new policy requirement arises.
Each time a new policy workspace site is generated using the template the same components will be automatically created and included.
By using a standard template users' familiarity with the site layout will quickly be established and will allow the organization to standardize the types of information stored about their policies.
For more information on how to create your own custom site template in SharePoint, have a look at this Microsoft article
Features of a standard policy workspace site
Using a template that you have created – let’s call it the ‘Policy Workspace Template’ – you may create a dedicated landing page with several shortcuts to other commonly used features. The following screenshot illustrates how a policy workspace can be used for collaborating on the "First Aid at Work" policy.
To ensure that the policy workspace team members read the required documents when they join the team we are using a third-party SharePoint app called DocRead. You can find more information about DocRead here: https://collaboris.com
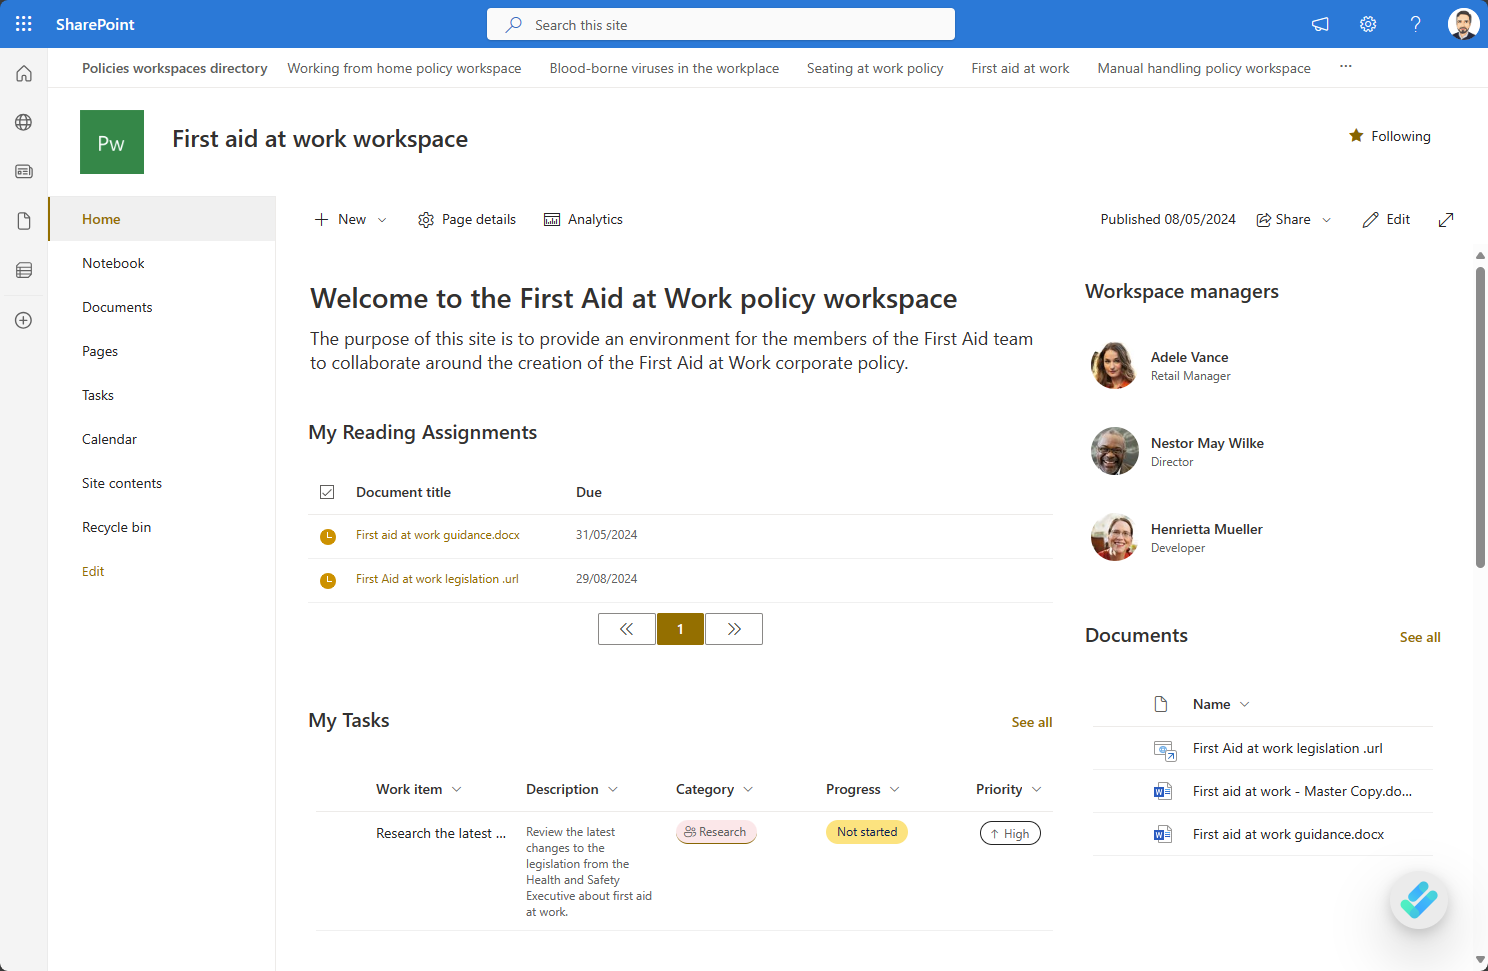
The above example of a "Policy Workspace" site homepage was created with the following web parts:
- Text web part - Showing the welcome message
- DocRead Assignments Web part - displaying the reading assignments assigned via DocRead to the current user.
- People web part - displaying the contact information of the workspace managers
- Document library web part - displaying the list of documents in the workspace
- List web part - displaying the list of tasks assigned to the current user
Elements of a Policy Workspace
The Policy workspaces may contain (but are not limited to) the following items:
- Workspace Pictures: Stores images that are used in the wiki, documentation or as part of reference materials.
- Workspace Documents: A storage location for links and documents used during research for the policy.
- Workspace Wiki:. To maintain notes and documentation about the policy.
- Reference Library: To store reference information that can help the production of a policy.
- Announcements: To highlight announcements related to the production of the policy.
- Calendar: Stores meetings and key dates in the life cycle of the policy.
- Links: Stores links to internal and external web sites that provide additional information and background to assist in the policy.
- Tasks: Stores team tasks that have usually been allocated as part of one or more workflows. A user’s ‘my tasks’ are presented on the landing page.
- Team Discussion: To encourage discussion between the team about the policy.
- DocRead: Used to target the reference documents in the ‘Reference Documents’ library to the policy makers.
Find out how DocRead can help
Find out how DocRead can help target your policies and documents by booking a personalized demonstration with one of our experts. During the call they will be able to discuss your specific requirements and show how DocRead can help.
If you have any questions please let us know.
DocRead has enabled us to see a massive efficiency improvement... we are now saving 2 to 3 weeks per policy on administration alone.
Nick Ferguson
Peregrine Pharmaceuticals
Feedback for the on-premises version of DocRead.
Securing the Policy Workspace site
Each Policy Workspace site should be independently secured to ensure that only the policy team can access policy-related content. Individual workspaces can be secured to ensure only those who need to work on a document (and see its task or workflow history) can do so.
To do this within a policy workspace it would be necessary to allocate roles to the various members of the team. For example, you may want certain people to view the documents, but not edit them. You may also want a couple of staff members to add new features to the site, such as a discussion board or a wiki.
As each workspace could be initially created with the following SharePoint groups, you would then simply need to place team members into the relevant group.
[Policy Workspace Name] Owners are the administrators of the site. They are able to access, view and amend any aspect of the site.
[Policy Workspace Name] Members are users who can contribute on the policy.
[Policy Workspace Name] Approvers. These users will finally sign-off and approve the policy. They may also be in the other groups if they wish to participate in development of the policy.
The added benefit of using a single workspace to manage the life cycle of a specific policy is that access to the policy can easily be ring-fenced. Doing this means that SharePoint search will automatically security trim search results. In turn, this ensures that a user may only view items they have access to.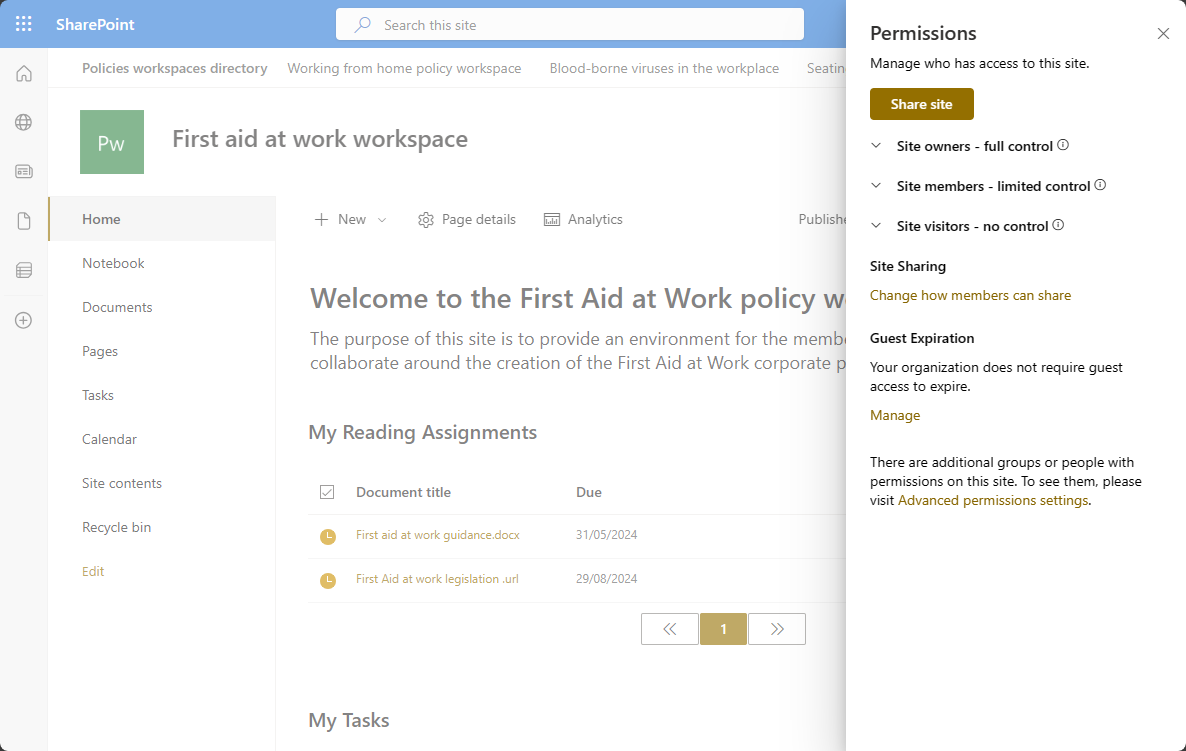
Having all of the documents, minutes, tasks and notes in a single secure location is far more advantageous than having emails, paper and documents lying in several places on-line and in the office. This approach makes anything you save on this site secure by default. Each policy will have its own space containing all historic working documents that have aided its development.

